# How to Configure Extensions
Extensions are a 3 digit identifier from the range 500 -- 599.
End users on your Business Phone System are assigned a unique Extension to manage their inbound and outbound call routing.
An internal end user on your Business Phone System can contact another internal end user by simply dialing their Extension.
Extensions can be defined within the Call Flow Features: Call Queues, Ring Groups, Auto Attendants and Redirection Triggers.
If you require additional Extensions, you will need to contact your service provider and request additional Extensions be added to your Business Phone System.
The following instructions detail how to configure an existing Extension.
# Configuring an existing Extension
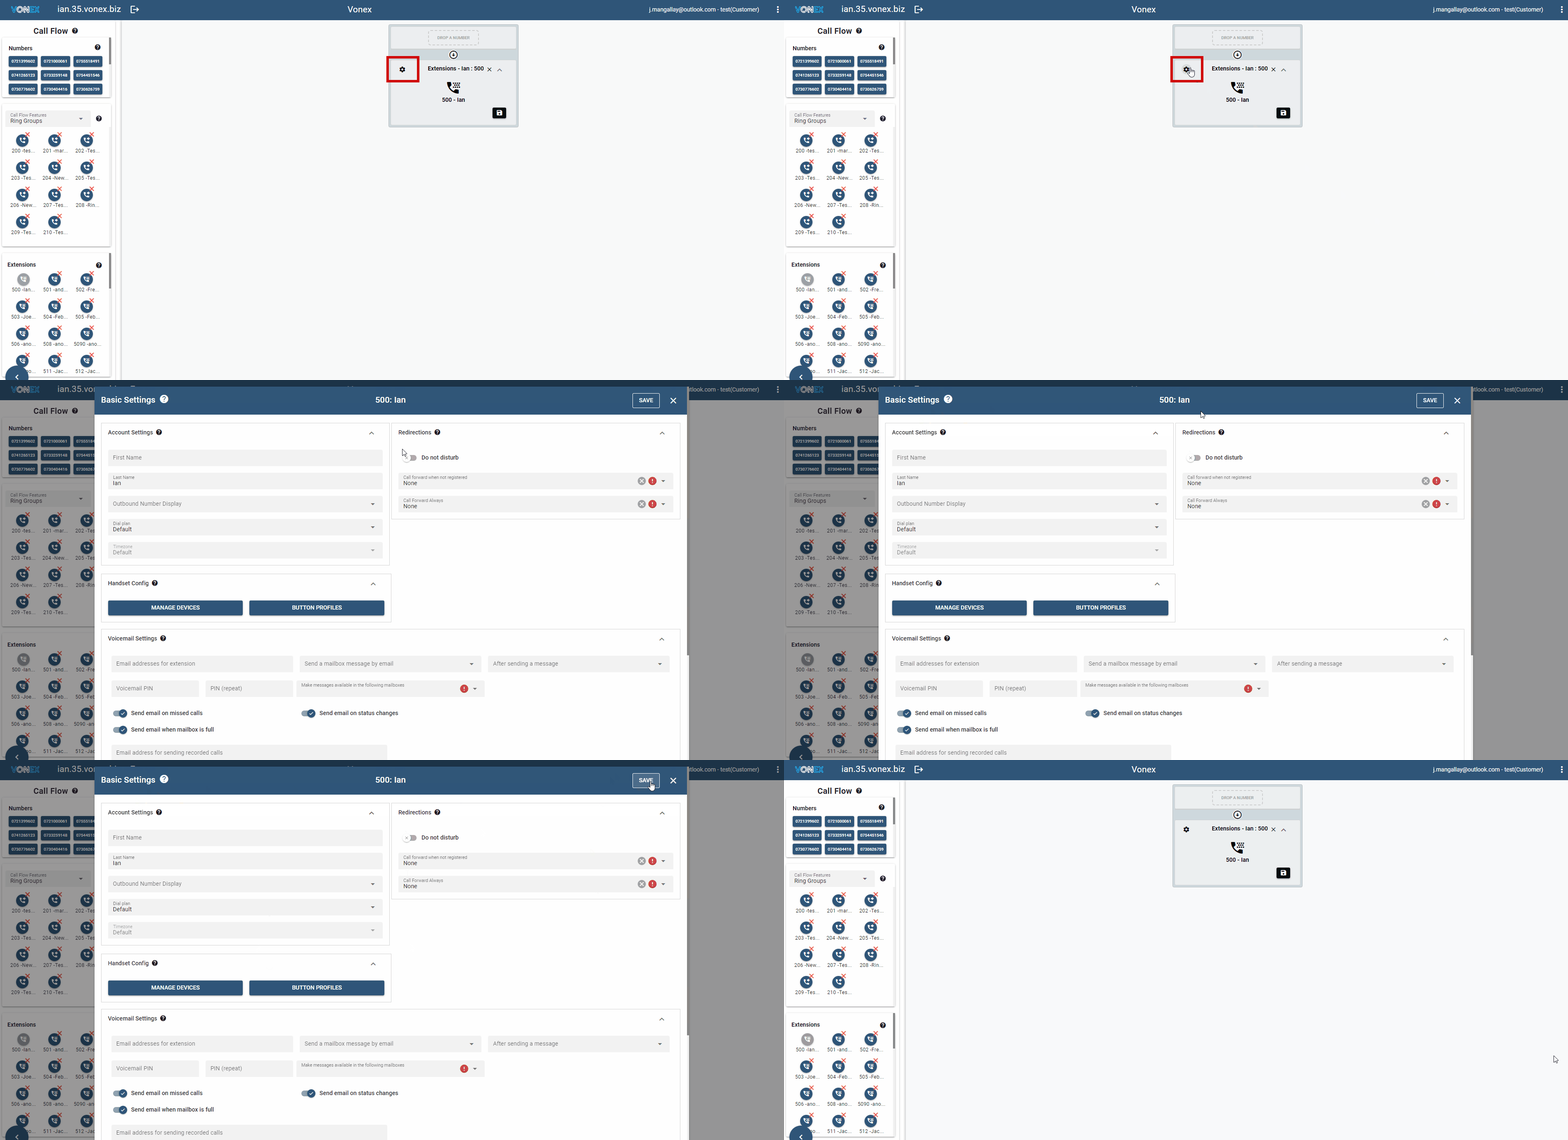
- To update the Extension click on the Settings Icon
. This will take you to the Extension Basic Settings page.
An alternate method to update the Extension is to Double Click on the Extension from the list of Extension accounts. This will take you to the Extension Basic Settings page.
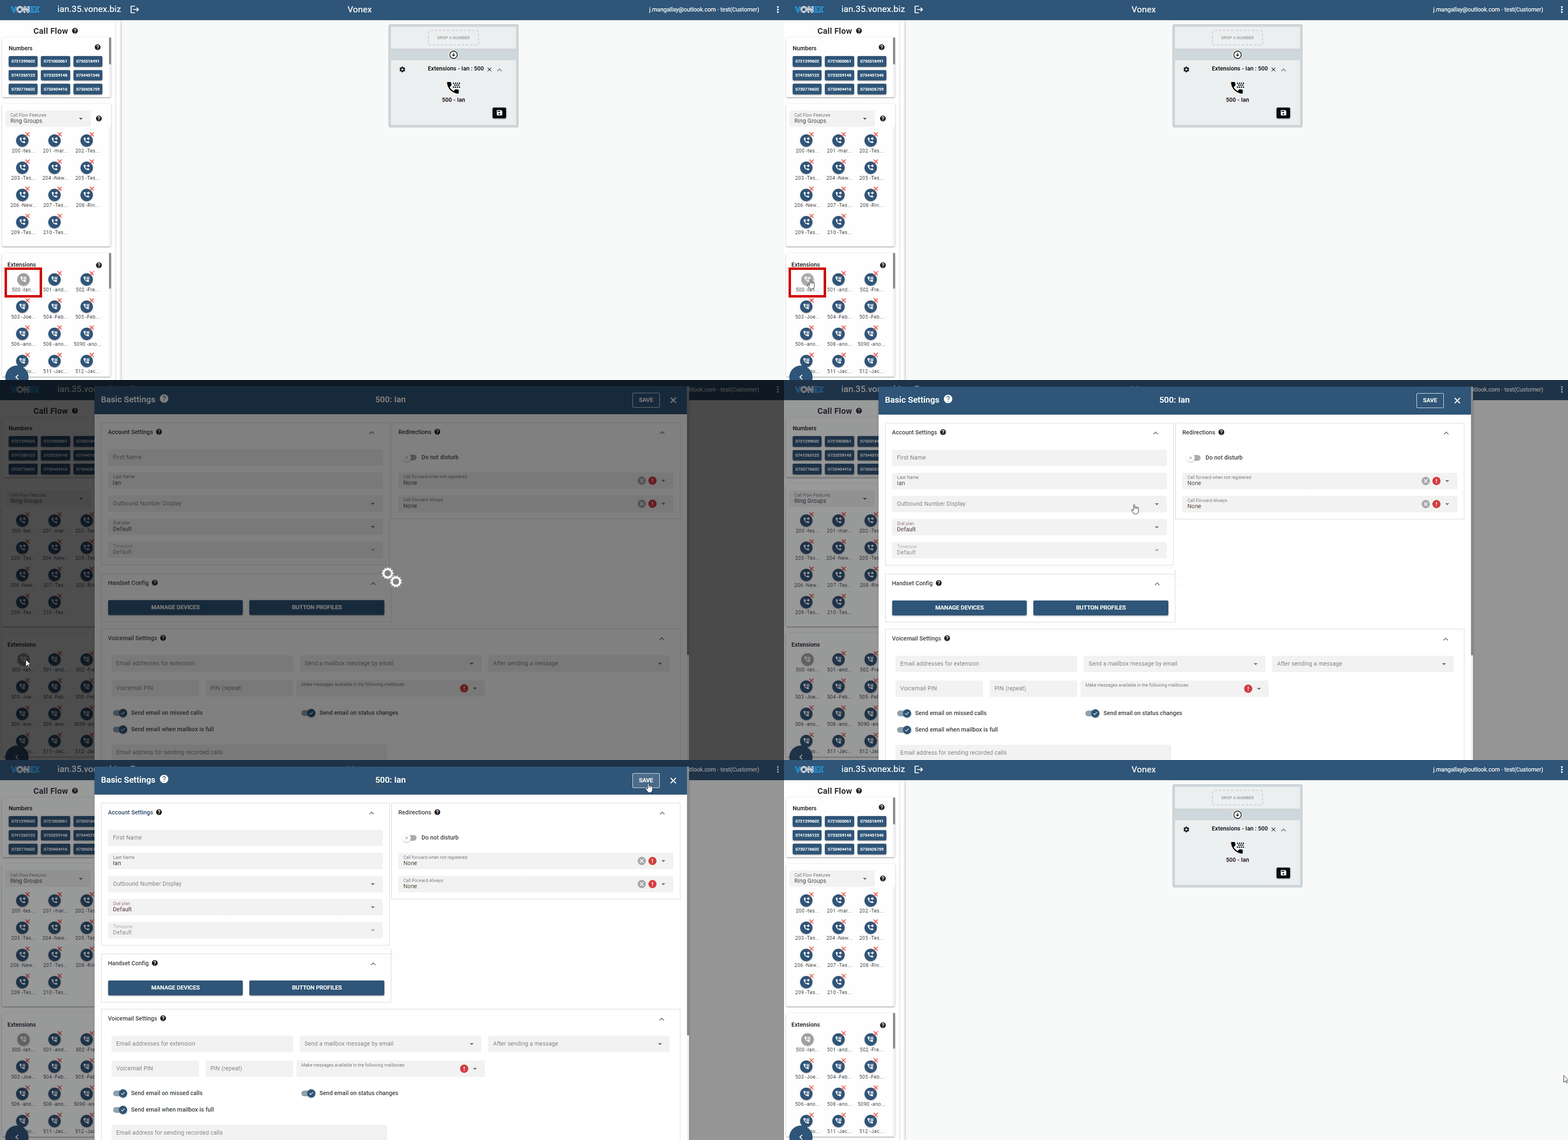
- The Extension Basic Settings page details the Extension's Account Settings; Redirections, Handset Config and Voicemail Settings.
# Account Settings
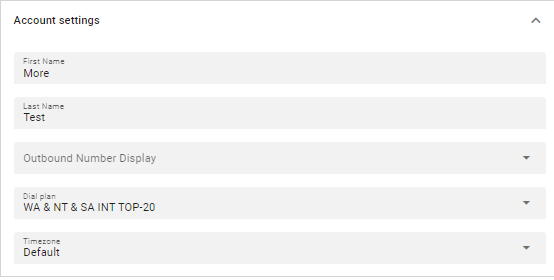
The Account Settings on the Extension default to the Account Settings defined during the account set up. These settings are customisable at an extension level.
First Name: Editable text : First name of the Extension end user.
Last Name: Editable text : Last name of the Extension end user.
Outbound Number display: Drop-down box : the number that will be displayed when outbound calls are made from the Extension. The drop-down box lists the numbers on the Business Phone System that can be selected. If you would like an alternate number to display, contact your service provider and request the number be added. You will also need to provide your service provider with proof of ownership of that number i.e. copy of that number on a bill if it is supplied by another service provider. Once your service provider has added the number it will appear in the drop-down box.
Dial plan: Drop- down box : Each State has a prefix : NSW (02) ; Vic and Tas (03) ; Qld (07) ; SA, WA and NT (08). When making an outbound call if you don't dial 10 digits (which include the state prefix) then the dial plan will determine which prefix is added i.e. if you are on the NSW dial plan and you only dial 8 digits the call will get the NSW prefix (02) prefixed to the dialled number.
Timezone : Drop-down box : either default or matching the time zone for the dial plan.
Click the Save button on the top right of the page.
# Handset Config
There are 2 buttons in Handset Config:

# Manage Devices
Click on the MANAGE DEVICES button to go to the MAC Address page to see the phones and their MAC (unique identifier like a serial number) addresses on your Business Phone System.
The Unassigned MAC Addresses table lists the available Phone Mac Addresses on your Business Phone System.
To add a phone to this extension Tick the Box showing that phones MAC Address.
Click the
button and the Mac will be moved to the Bind to Mac Address table.
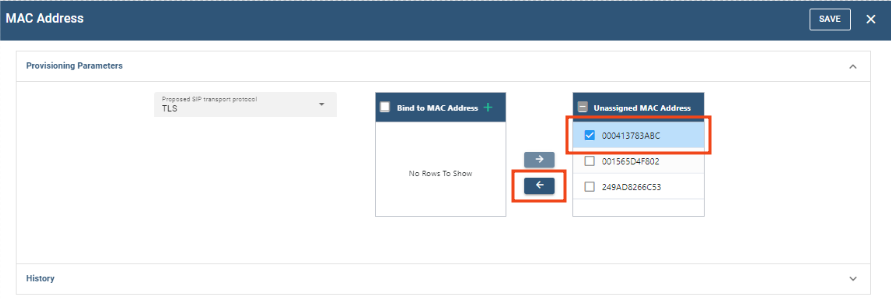
Once the MAC has been moved into the Bind to MAC Address table.
Tick the Box to the left of the Mac Address.
Click on the pencil to Update the Mac details before adding the phone to this extension.

- This will take you to the Update MAC details page.

On the Update MAC details page the MAC should appear in the Enter the MAC address field.
Select the Phone vendor from the drop-down menu.
Select the Phone model from the drop-down menu.
Click the Add button.

There will either be a confirmation message that the phone has been added or a notification message if the phone with that MAC is defined elsewhere. If the MAC is defined elsewhere, please contact your service provider to assist and if need be, release it.
Click the Save button on the top right of the page.
The phone with this MAC address will be added to the Extension with the default configuration settings.
# Button Profiles
Phones are added to extensions with that phone model default configuration.
- To customise the button profile for a phone assigned to this extension Click on the BUTTON PROFILES button.
- You will be presented with the Button Profiles page.

- Select the phone / Mac Address from the drop-down list.
You will be presented with the Button Line Key configuration - **Line Key 1 -- Line Key 15 (**please note that the line key configuration is dependent on the model of the phone)

The "Number" column details the Line Key buttons on the phone.
Leave the "Identity" column as default or assign the corresponding number i.e. 1 for Line Key 1 etc.
"Type" is a drop-down list of the options you have for this Line Key eg:
You may configure a Line Key on the phone itself.
You may configure a Line Key with one of the Business Phone System Call Flow features such as Call Queue -- once you select Call queue you will be presented with a drop-down window in the Parameter column -- that window will present the active Call Queue accounts. Once you select the account that will be presented in the label column
You may configure a Line Key with a Private Line -- once you select Private Line you will need to update the Label Column with the phone number of that Private Line.
After you have updated your Line Keys Click the Save button on the top right of the window.
There are 2 Line Key configuration displays: graphic (if Graphics Mode enabled) or table (if Graphics Mode disabled)
Disabled
Enabled
Following is the Graphics Mode Display

# Redirections
There are a number of Extension redirection options available on your Business Phone System. The Basic Settings screen enables you to reconfigure the most commonly used redirections.

Do Not Disturb -- the default is disabled and calls will be routed to this extension. It will appear as
Do Not Disturb -- when enabled calls will not be routed to this extension. Th extension will still be able to make outbound calls. It will appear as
Call Forward when not registered -- from the drop-down menu select how you would like calls to this extension to be redirected if the device assigned to this extension is not registered. Once you have selected the redirection destination Click the Save button on the top right-hand corner.
Call Forward Always - from the drop-down box select how you would like any call to this extension to be redirected. Once you have selected the redirection destination Click the Save button on the top right-hand corner.
Drop-down menu symbols
expands the drop-down menu to show redirection endpoint options.
symbol will appear if no redirection has been selected and "None" is appearing as the redirection endpoint.
Clears the redirection destination.
# Voicemail settings
Every extension has optional Voicemail. The Basic Settings screen enables you to configure the voicemail settings.
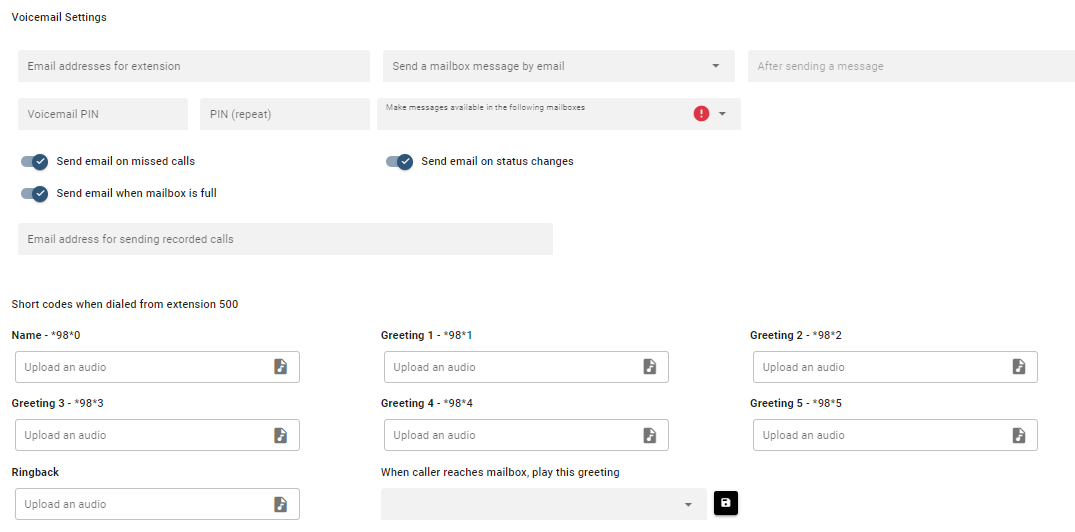
Email addresses for an extension: the email address/es that the recording of the voicemail message will be sent to.
Send a mailbox message by email: from the drop-down menu select whether or not you want the voicemail message sent by email and if you do whether it is purely a notification or if it has a recording of the voicemail attached.
Voicemail PIN / PIN repeat: the PIN you nominate for to retrieve voicemail messages.
Make Messages available in the following mailboxes: nominate additional extensions that will have access to this extension's voicemail messages. If this field is blank the
symbol will appear.
Buttons to enable or disable send emails on missed calls; send emails on (mailbox) status changes; send email when mailbox is full.
enabled
disabled
Email addresses for sending recorded calls: the email address/es that the recorded calls will be sent to.
Short codes when dialed from Extension: Allows the extension to upload customised greetings categorised as : Name ; Greeting 1-5
When caller reaches mailbox play this greeting: from the drop-down menu select which customised greeting you would like enabled.
Once you have updated any voicemail setting Click Save from the top right- hand corner.